
Getting started with NivoSearch is simple. As soon as you activate the plugin, NivoSearch automatically creates a default Search Preset for you.
No configuration is required. You can immediately add the search bar to your website using the preset’s shortcode.
You can always customize the search experience later, but it’s not required to get started.
Step 1: Install and Activate NivoSearch
Install and activate the NivoSearch plugin from your WordPress dashboard.
Once activated, NivoSearch automatically creates your first Search Preset with the recommended default settings.
If you haven’t installed the plugin yet, follow the Installation guide first.
Step 2: Open Search Presets
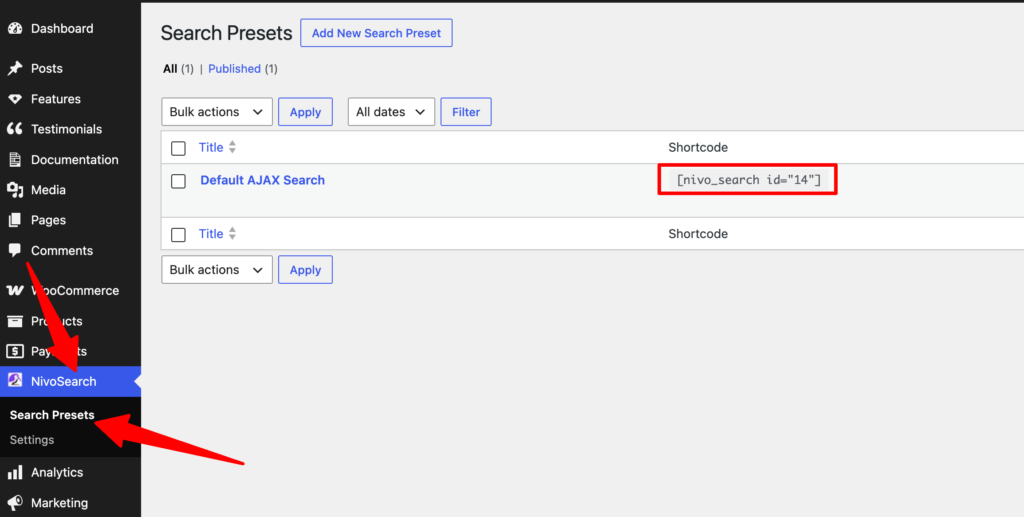
In your WordPress dashboard, go to:
NivoSearch → Search Presets
Here you’ll find the default Search Preset created during installation.
Step 3: Copy the Shortcode
Each Search Preset has its own shortcode.
It looks similar to this:
[nivo_search id="14"]Note: The number inside the
idattribute is unique to your website and may be different. It represents the ID of your Search Preset.
Simply copy the shortcode for your preset.
Step 4: Add the Search Bar
Paste the shortcode anywhere you want to display the search bar, including:
- Header
- Navigation menu area
- Homepage
- Sidebar
- Shop page
- Landing pages
- Any post or page that supports shortcodes
Once added, your search bar is ready to use.
Customize Later
The default Search Preset is ready to use, but you can customize it whenever you like.
For example, you can:
- Change the search bar appearance
- Customize the search results
- Enable additional search features
- Create multiple Search Presets for different areas of your website
All changes are optional and can be made at any time.